Showing posts with label DIY. Show all posts

Monday, May 23, 2016

Teacher Summer Gift

Wow has it really been 2 years since my last post?!? Time sure flies by.
I wanted to post this summer gift I made for my daughter's preschool teachers before it's too late.


It's a Thank you for a wonderful school year/Happy summer gift. Being pregnant (yep again) and very busy, I quickly put together this simple tag for the Tupperware Tropical Glamour tumblers I bought. The 16 oz. tumblers came as a set of 6, which was perfect because I have 6 teachers give these gifts to. I love the bright tropical designs that Tupperware made for their summer products. To add the "cuteness factor" I used Melonheadz sun clipart and font for the tag. I just grabbed a scissors and free-hand cut out the label and sun. Then used scrapbook paper to add detail to the bottom. Glue on the sun and scrapbook paper to the tag. Punch a hole at the top and string through baker's twine. Then the easy part, I bought a couple different flavors of Crystal Light To-Go packets and placed them inside the tumblers. That's it...you're done!

Here is the template for the tag if you want to make this project:


I realize how hard teachers work and like to make little gifts to show my appreciation. This gift idea would also be nice for neighbors, co-workers, friends, etc. I always find myself last-minute, scrambling on pinterest trying to find easy gift ideas. So if you are a procrastinator and looking for a fast and easy gift please pin this post and share with others!

Hope you all have a fun summer and I hope to be posting more projects soon :)

Monday, January 20, 2014

Little Big Moments #9

Hey everyone! Are you ready to think back to last year? I hope so...
Download Pages 18 & 19 for FREE!
http://www.teacherspayteachers.com/Product/Little-Big-Moments-Pages-16-17-Printable-993485
Page 18
Title: Give Thanks
Theme/Prompt:Thanksgiving 


Page 19
Title: Bookworm
Theme/Prompt: Record some of your favorite book to read


I hope you all have fun while going "back in time" to create your Thanksgiving page!


Saturday, January 4, 2014

Clean 2014!

One of my New Year's resolutions is to clean up my house! A new year means its time to replace my old cleaning chart with a new 2014 chart. This cleaning chart helps me keep track of tasks that don't have to be done very frequently (in my household). I came up with this system because I kept asking myself, "Did I clean the fish tank this month?" or "When am I supposed to change the water filter?"
So here is my old cleaning chart:
and here is my new cleaning chart:
Ok, let me explain a few things...
  • This chart works for my household, you can change the tasks and frequency to fit your household. Once I have completed the task for the month or time period I mark an "X" in that month's column. 
  • Deep cleaning/ shampooing the carpet I try to do once a month. 
  • Cleaning Pablo's tank is also once a month. 
  • I used to wash the linens once a week but now I try to wash them every two weeks.
  • I always forget to check the fire alarm/smoke detector so I added that to the chart. Notice the little battery in March's block? That is my reminder to change the battery. I know that fire prevention month is October but I chose to put my reminder in the month of March since it's (usually) not a busy month. 
  • Cleaning/organizing my desk and deep cleaning the fridge are both done every-other month. I used to deep clean the fridge every week but I switched to every-other month because my fridge doesn't really get that dirty. My fiance words: "Why are you cleaning our fridge this is already clean?!"
  • The windows & fans get cleaned quarterly along with the patio & garage. 
  • My year is broken into 4 quarters: December-February, March-May, June-August, September-November. This is because I felt too stressed to clump all the busy holiday months into one quarter. Got this idea from the fiscal year ;)
  • My washer and dryer gets deep cleaned twice a year.
  • I change my Brita water pitcher filter every 4 months. The instructions say to change the filter approximately every 2 months but here in Hawaii the water is fairly clean so I don't change it as often. (Plus it saves some money.)
And...for continuity I my wanted my chart to match the labels in my pantry cabinets since I post it up on the inside of my cabinet door! 

Feel free to use my cleaning schedule template or customize your very own by using the blank template:

 I wish you all Good Luck with reaching your New Year's resolutions!

Sunday, November 24, 2013

Little Big Moments #8

Hello fellow crafters!
Pages 16 & 17 are all about animals!
http://www.teacherspayteachers.com/Product/Little-Big-Moments-Pages-16-17-Printable-993485
Title: A is for Animal
Theme/Prompt: Introduce your animals (pets) or discover new creatures!
To Create: 
step 1. Download printables
step 2. Cut embellishments out
step 3. Design/decorate pages
step 4. Add journaling & photos (optional)
step 5. Tape/glue

Here are my two pages: 
http://www.teacherspayteachers.com/Product/Little-Big-Moments-Pages-16-17-Printable-993485
http://www.teacherspayteachers.com/Product/Little-Big-Moments-Pages-16-17-Printable-993485 
*Notes:
  • If you don't have any pets you can search for creatures outdoors or visit your local zoo.
  • This is a great opportunity for kids to observe and learn about animals.
Remember to have fun and cherish these wonderful moments!

Sunday, November 17, 2013

Little Big Moments #7

Are you ready for pages 14 & 15?
These two pages took a little longer to create, but I finally finished it!

Pages 14 & 15:
http://www.teacherspayteachers.com/Product/Little-Big-Moments-Pages-14-15-Printable-980804
Title: Out & About
Theme/Prompt: Document an ordinary (or not so ordinary) day in your life
Additional Materials/Supplies: shopping lists, receipts, business cards, ticket stubs, etc.
To Create: 
step 1. Download printables
step 2. Cut embellishments out
step 3. Design/decorate pages
step 4. Add journaling & photos (optional)
step 5. Tape/glue

Here are my two pages: 
http://www.teacherspayteachers.com/Product/Little-Big-Moments-Pages-14-15-Printable-980804
I'm surprised that I did a lot of journaling this time.
 
*Notes:
  • I copied my receipts and printed them out on cardstock.
  • I like the idea that when my daughter is older she can compare the price of gas and groceries. I wonder how much these prices will increase or decrease in the years to come!
  • The paperclip flag can be used to clip all of your documents together or for decoration.
  • This project would be really cool for black Friday receipts!...not sure if I'm going to shop on black Friday this year. Hmmm...
To make the pocket that will hold all of your documents simply cut it out then fold the tabs back. Adhere the pocket tabs to your page by using double-stick tape or glue.
To make the paperclip flag, first cut it out and fold it in half. Then place the flag around a paperclip and glue the two flaps together.
When you are done they should look something like this:
Here is my completed pocket:
I love washi tape :)
Hope everyone likes these pages and I hope that this project inspires you to document all of your family's "Little Big Moments."

Thursday, November 14, 2013

Little Big Moments #6


Pages 12 & 13 are ready!
To download pages 12 & 13 for your smash book click below:
http://www.teacherspayteachers.com/Product/Little-Big-Moments-Pages-12-13-Printable-977438
Title: Art Gallery
Theme/Prompt: Frame your child's artwork.
Additional Supplies: Crayons, Markers, Paint
To Create: 
step 1. Download printables
step 2. Cut embellishments out
step 3. Design/decorate pages
step 4. Add journaling & photos (optional)
step 5. Tape/glue
*Notes:
  • I designed 2 frames for you to choose from: one with a light, one without. I used the frame with the lights.
  • My daughter loves to color with crayons, but you can have your child use paint, markers, stamps, etc.
  • Ideas for older kids: Self-portrait, Family portrait, Color a coloring book page.  
  • I had my daughter draw on a blank piece of paper. Then I used an xacto knife to cut out the white portion of the frame. I just trimmed her drawing to fit in the frame. I feel that makes the frame a little bit more realistic and adds dimension to the page. You can eliminate this additional step by having your child create their artwork directly in the white space that your frame is printed on. 
  • It was hard taking pictures of my daughter coloring because she always wants to play with my camera and iphone. Any tips?
My pages look like this...

Hope you all are having fun creating these pages for you Little Big Moments smash book!


    Friday, November 8, 2013

    Little Big Moments Page 10

    My Shutterfly prints finally came in! Yeah!
    Sorry for the wait...Here is how my page turned out:
    http://www.teacherspayteachers.com/Product/Little-Big-Moments-Page-10-Printable-953512
    http://www.teacherspayteachers.com/Product/Little-Big-Moments-Page-10-Printable-953512 
    I used the gravestone for journaling and to make a pocket. This is how I made it:
    I cut out tabs on the sides and bottom. Then I scored along the outline so it would be easier to fold the tabs.
    http://www.teacherspayteachers.com/Product/Little-Big-Moments-Page-10-Printable-953512
    This is how the back looks with the pocket tabs folded in. All you need to do is apply double-stick tape or glue on just the tabs and place it onto the page. Note: I did my journaling before I glued the tombstone on in case I made a mistake.
    http://www.teacherspayteachers.com/Product/Little-Big-Moments-Page-10-Printable-953512
    And you're done!
    http://www.teacherspayteachers.com/Product/Little-Big-Moments-Page-10-Printable-953512
    Tip: When I make journalling mistakes like typos or I realize that I wrote too big, I just re-print the embellishments that I need to re-do. You can also re-size the embellishments in Microsoft Word by using the picture editing toolbar.

    Document your family's Halloween by downloading page 10 embellishments for FREE:
    http://www.teacherspayteachers.com/Product/Little-Big-Moments-Page-10-Printable-953512

    Tuesday, November 5, 2013

    Little Big Moments #5

    Happy Monday!
    Today I was able to work on page 11. It is a simple page but still lots of fun!
    Get page 11 for FREE here:
    http://www.teacherspayteachers.com/Product/Little-Big-Moments-Page-11-Printable-960204

    Title: the color BLUE
    Theme/Prompt: Find the color blue in your surroundings.
    Additional Supplies: Washi Tape (optional)
    To Create: 
    step 1. Download printables
    step 2. Cut embellishments out
    step 3. Design/decorate pages
    step 4. Add journaling & photos (optional)
    step 5. Tape/glue
    *Notes:
    •  I used this prompt to help my daughter learn the color blue. 
    • We gathered together all the blue objects in her playroom. This shows that all the items have the color blue in common.
    • We also searched for blue things at Nana's house. I figured that this would teach her to observe her surroundings.  
    • Try looking for a blue object that you can put in your smash book. My daughter and I found a joker in a deck of cards.
    •  If you can't find an actual object to include on this page, don't worry. You can take pictures of all the blue things that you guys found to document this activity.
    • On the journaling card that says: "things that are the color blue" I wrote all of the object that we found and that are shown in the pictures. You could ask your child to think of things that are blue and record them on the journaling card. 
    • This page is fast and simple to do!
     Here is how my page turned out:
    http://www.teacherspayteachers.com/Product/Little-Big-Moments-Page-11-Printable-960204
    I couldn't resist using washi tape hehe :)


    Sunday, November 3, 2013

    What Have I Been Working On?

    Time doesn't slow down for anyone! I've been keeping busy with a lot of holiday projects.

    Thank you to all of you who purchased my Boo Mix printable label from my TeachersPayTeachers shop!
    It was actually a last minute project so I didn't even have time to blog about it. Sorry...
     
    Here is my November printable that I made:
    http://www.teacherspayteachers.com/Product/Thanksgiving-Color-Cutout-Worksheets-958237
    You can purchase this Thanksgiving project at my TpT shop:
    http://www.teacherspayteachers.com/Store/Live2love
     Another printable I finished is a President Obama quote. I'm not really into politics, but I'm obsessed with Melonheadz illustrations so I wanted to use the Melonheadz image of Obama. I know he is not the most liked right now, but I guess I still have faith in him???
    Here is my dog sitting next to the President:
    http://www.teacherspayteachers.com/Product/President-Obama-Quote-953516
     President Obama's quote bubble got cutoff in the picture but it says:
    "A change is brought about because ordinary people do extraordinary things."
    You can download this Obama poster for FREE at my TpT shop!

    Lastly, I'm excited because my Etsy order of washi tape arrived!!
    The colors match perfectly with my Little Big Moments book!
    Can't wait to use them on future Little Big Moments pages. :)
    Don't worry I haven't forgot about Page 10! I am waiting for my Shutterfly prints to come so I can complete my page. As soon as I'm done I will post it!
    Thanks for your patience and understanding!

    Thursday, October 31, 2013

    Bonus Halloween Page!

    Wow I can't believe it is Halloween already! This is a really last minute post because at first I was planning to do a Halloween page, then I changed my mind, then I decided that I still wanted to do it.... As a result of my indecisiveness page 10 is only half a page. Sorry!

    So please download page 10 for FREE:
    http://www.teacherspayteachers.com/Product/Little-Big-Moments-Page-10-Printable-953512
    Note: I did change the color scheme for this page so it would look Halloween-ish. (But it's still cute right?)
    I hope to be posting my completed page 10 soon! Thanks for all your patience!

    As a reminder...
    Shutterfly has 101 FREE 4x6 prints.
    (you just pay the cost of shipping)
    Use promo code: SPOOKY
    This offer is good until tomorrow (Nov. 1) so don't forget!

    Hope you all have a fun and safe Halloween!

    Thursday, October 24, 2013

    Little Big Moments #4

    Sorry these pages took so long! I had to make some design changes to get the embellishment sizes just right. These pages are so fun to create because it contains actual "page-thickening" elements that makes a smash book a smash book!

    Here are pages 8 and 9:

    Title: Sky's the limit
    Theme/Prompt: Measure your height
    Additional Materials: Bakers twine (can use yarn or ribbon), 4 brads 
    To Create: 
    step 1. Download printables
    step 2. Cut embellishments out
    step 3. Design/decorate pages
    step 4. Add journaling & photos (optional)
    step 5. Tape/glue

    *Notes:
    • These two pages are designed to document you and your child's height using string. 
    • I also wrote down our heights on the journaling card.
    • I chose to wrap my twine so it wouldn't get tangled.
    • I used the clouds to hide my baker' twine. 
    • Make sure to print the hot air balloons on card stock so they are studier. 
    • You can choose to wrap the string around the hot air balloon if you don't have brads. Just glue the clouds leaving the top open to create a pocket for your hot air balloon.

    Height Keepsake Instructions:
    • Cut out hot air balloon and clouds.
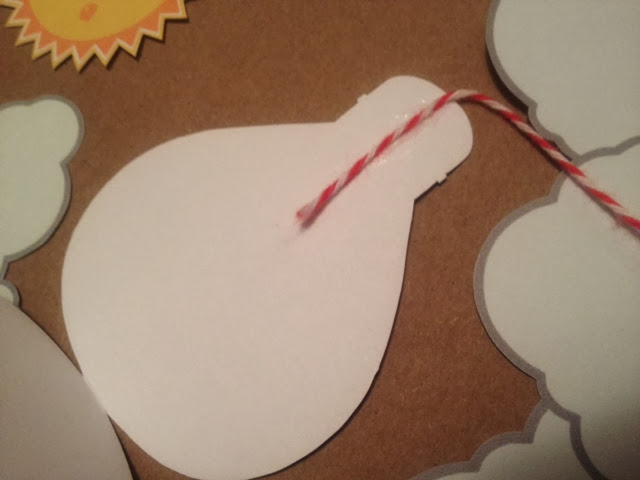
    • Fold hot air balloon in half.
    • Glue one end of twine to the hot air balloon, then glue the folded balloon together. ↓
    It should look like this ↓

    • Measure and mark height with the twine or ribbon.
    (Try not to stretch the string by pulling too hard.) ↓


    • Using a brad create 2 holes at each end of the cloud. ↓
    • Tie a small loop at the other end of the string.
    • Place the string loop on one brad so that the string is attached to the cloud. ↓
    • Secure the brads onto your page by opening the two prongs in the back.↓
    • Then all you need to do is wrap your string around the two brads. ↓

    To see how much your child is growing, simply unwind the twine.
    Finished!

    Here is what my pages look like ↓
     

    I used the small banner embellishments to label the strings with our names so we know whose string height is whose. 
    ↓
    If you are doing this project with older kids, you can teach them about length measurements and measuring tools (rulers/tape measures).
    Remember to have fun!